 |
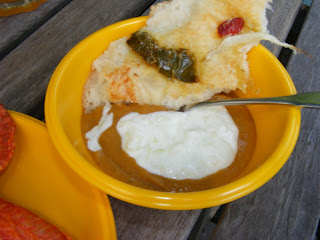
| Not exactly a glamor shot, this is Indian-Spiced Sweet Potato Soup in a plastic bowl with a big dollop of cucumber raita and a chunk of Onion & Sweet Pepper Focaccia. |
|
|
Indian-Spiced Sweet Potato Soup
This soup is a pureed vegetable curry, basically. It has a silky texture and is filling without being heavy. I looked at many, many recipes for Sweet Potato Soup, but I ended up creating something a little different, with more sweet potato and more spice.
- 3 tablespoons vegetable oil or ghee
- 1 large onion, peeled and diced
- 5-6 cloves garlic, crushed
- 2- to 3-inch piece fresh ginger root, peeled and minced
- 2 tablespoons ground cumin
- 2 tablespoons ground coriander
- 2 tablespoons ground cardamom
- ¼ teaspoon ground nutmeg
- ½ teaspoon black pepper
- 2 bay leaves
- 1 can (15 oz) coconut milk
- 4 yams, peeled and cut into large pieces
- 4 cups good quality vegetable stock
- salt to taste
Heat a dutch oven over medium-low flame; add the oil. When oil is hot, add the onion, garlic and ginger root. Saute until the onion is translucent and begins to brown, about 15 minutes.
Add the spices and the bay leaves. Continue sauteing until the spices are toasted slightly, releasing their aromas. Then, add the coconut milk, yams pieces, and stock.
Lower the heat (as low and slow as you can get it) and put a lid on the pot. Allow the spices to infuse the liquids and the yams to slow-boil until very soft, 30 to 40 minutes.
Remove the bay leaves. Add salt to taste, taking into account the salt content of the broth you're using. Some recipes add a little brown sugar, but I have always found that yams and sweet potatoes don't need need the sugar boost; they're plenty sweet all on their own. Cool for 15 minutes with the lid off, then puree the vegetables with all the liquid using a blender, food processor, or in the cooking pot using a hand blender.
Serve hot or at room temperature with, if you like, a dollop of cucumber raita our sour cream (both of which go great with the aromatic spices) and some bread for dipping.
I found this soup absolutely wonderful, but most of my friends at the Post-Rapture Feast last Sunday didn't try it. Apparently, the food habits of the natives of northeast Ohio do not include the eating of soup on a 80-degree spring day, even if the soup is cold. I was surprised to learn this, being myself from places on Planet Earth where soup makes an appearance on the dinner table 365 days a year.
But that's all right. More for me!
Onion & Sweet Pepper Focaccia
First off, I apologize for this recipe. I've been making bread since 1974, when I was 16. I don't remember how I ended up with a copy of
The Tassajara Bread Book, by Edward Brown, but the book shifted my life in a serious way. I stopped thinking about cooking as a chore to be done correctly, following a recipe, and started thinking about cooking as something much more organic. Overnight, cooking became organic, physical (like dance or swimming) and a celebration of life, contemplation, love.
Sometime in the mid-80s, when my daughter was a toddler, I quit referring to the book completely yet kept making breads using the same basic method. More and more, I began to rely on my own inter-personal animal instincts (because yeast, after all, are living beings) and took my inspiration for ingredients from whatever bounty or interest came into my daily life--like dried apricot bread (1980s) when we lived in Walla Walla, WA, renting a house with three apricot trees, kaas bread in the Netherlands, where I would always order too much cheese from the wonderful cheese vendor, and crushed hemp seed bread in Youngstown, OH, not because culinary hemp seed is plentiful but because... well...it's available, a great source of protein, and (though perfectly legal) a little bit naughty.
When I make bread, I do not always know or even track the amounts of the ingredients (especially flour) that I use, because I've come to realize over the years that, with bread making, much depends on the weather, the humidity, the room temperature, and the age and quality of the ingredients. Nonetheless, I'll try to explain how I made this:
- 1 cup warm water
- 1 tablespoon brown sugar
- 2 tablespoons dried yeast
- enough bread flour
- 2 cloves garlic, crushed
- 1 tablespoon salt
- 1/8 cup plus 2 tablespoons extra virgin olive oil
- more bread flour
- 1/4 sweet Vadalia or other sweet onion, sliced into moons (and enough boiling water to cover)
- strips of roasted pepper (I used jarred peppers preserved in oil)
- percorino romano cheese
Put the warm water (warm, but not hot, when you splash it on the inside of your wrist, as if testing the temperature of a baby's bottle of milk) in a large, non-reactive bowl. (Glass, crockery, Corningware and stainless steel are non-reactive; aluminum and copper are reactive.) Add the sugar and dry yeast. Stir until both dissolve, then walk away for 15 to 20 minutes.
 |
| the sponge |
When you come back, the concoction should be bubbly. Use a large wooden (or other non-reactive) spoon to stir in enough bread flour to form a batter about the consistency of thick mud, quick sand, or lava: It should not be thin, but it should still be pourable. Cover the bowl with a damp towel and walk away again.
Thirty to forty minutes later, check the "sponge." It should be a bubbly, thick mud almost twice the size as when you left the room to do other things. If not, let it raise and ferment a little longer, then stir down the sponge until most of the bubbles collapse.
Add the garlic, salt and 1/8 cup olive oil, stirring in each addition.
Add more bread flour, half a cup at a time, folding in each addition from the outside of the bowl into the center of the dough. The point here is to never cut through the dough with the spoon, if you can help it, because we want to encourage the dough to form long strands of elastic, gluten. Gluten makes bread chewy.
After several additions of flour, you'll need to abandon the spoon and use one of your hands as a tool. Keep adding flour until the dough starts to pull together as a ball.
 |
| This dough has enough flour but has not been kneaded yet. |
Many bread books will tell you to turn this ball out onto a floured surface for kneeding at this point. I think it's
a lot easier and certainly
a lot less messy to continue working the dough in the bowl, but go ahead and turn the dough out onto a floured board or counter, if you wish. I, however, continue in the bowl to kneed--pushing down into the middle of the ball, then folding the dough, turning the dough a quarter turn to the left, then pushing it down again and folding again. I'll add sprinklings of flour when things get sticky. And before too long, the dough has a smooth surface and no longer sticks to the bowl at all. And that's what we want.
It sounds like magic, but actually, it's easy. It's chemistry, it's biology, it's a small amount of elbow grease.
Drizzle 2 tablespoons of olive oil over the ball of dough in the bowl, flip the ball over several times so that the oil covers the entire surface, then cover the bowl with a damp cloth and walk away again for a full hour.
I love the walking away part of bread baking. Set a timer and read a book. Set the timer, tuck it in your pocket, go outside and play with your dogs. Set the timer and do the laundry. Set the timer and do something else. This is the only kind of multitasking that makes sense to me.
While the dough is raising, take a few minutes to slice the onion, put it in a bowl and cover it with boiling water. This will take the onion "bite" away without really cooking the onion.
 |
| Onion moon slices blanching in hot water. |
When you get back from your hour-long break, the dough will be alive, very happy, and twice its original size. Now it's time to punch it down (but not in a bad way). Punch down and push all the air bubbles out of it, fold and collapse the dough to its smallest size, then kneed it a few times for good measure. The yeast will love it, the bread will be better for it.
Oil or grease a half sheet baking pan (a.k.a. cookie sheet). Put the dough in the center and roll it out to the desired thickness. Imagine that the dough will be two to three times thicker after baking, and use that image in your mind to base your decisions about how thin or thick to make it.
Once you have the dough rolled out, you can start topping it. Drain the onion and distribute the onion slices over the surface of the dough, then do the same for the pepper strips. Grate pecorino romano cheese, like a snow drift, over the entire focaccia.
Just looking at the last two photographs (above), I can see that the camera picks up what is happening here while you're adding the last touches -- the dough is alive, picking up speed, continuing to expand and lift even in the 5 minutes it takes to add a few toppings and grate a bit of cheese.
Bake the focaccia in a "fast" oven (as my grandmother used to say), 400 to 425 degrees. Leave it alone (don't even peek!) for 30 minutes. Allow it to cook a bit longer, if it isn't yet cooked through and golden brown.
Obviously, you can put any toppings you like on the focaccia. It's basically a thick pizza without sauce or mozzarella cheese.


